[ad_1]
Remember the classic method of tying shoes?
The one we learned as kids?
Granny Knot?
Bunny Ears?
Whatever the method you used…
It’s wrong.
I know, bold statement.
But stay with me for a second.
It’s actually only partially wrong.
That method leaves the laces of dress shoes crooked and unbalanced.
The method that I am going to teach you has one small distinction.
But pay attention, it’s easy to miss. (Hint: It’s found in how you start the first knot)
This one distinction will ensure your shoe laces lie horizontally across your foot the entire day, rather than a crooked vertical mess.
Why should you care about how your laces look?
- Aesthetics – The knot sits flat and the bow lays across the shoe upper instead of along the length of the shoe.
- Security – Tie your shoelaces the right way to ensure they don’t come apart or loosen as you walk.
- Comfort – The purpose of shoelaces is to keep the shoes on your feet. Do it right and you will avoid discomfort from too-tight or too-loose laces.
It’s time to move past the ‘bunny ears’ that you were taught in kindergarten and make this simple style upgrade. The granny knot just isn’t elegant enough for a quality wingtip or any men’s dress shoe.
How To Tie Shoes The Wrong Way

If your shoelaces are always coming undone, or you have a crooked shoelace bow, you probably used an unbalanced granny knot.
The granny knot is the standard and most well-known technique for tying shoe laces.
If you are tying your shoelaces with a granny knot, the laces tend to sit vertically (from heel to toe), instead of horizontally across the top part of your shoe like a bow-tie. There is also a higher likelihood that your laces will come undone. It also looks a little off when wearing a clean dress shoe.
This produces an unstable and aesthetically incorrect bow-like knot which is referred to as ‘granny knot.’
How do you know this is the wrong way to tie shoelaces?
Simply pull the strands at the base of the knot and you’ll notice the bow lies vertically – from the toe to the heel. This is the orientation the shoelace knot takes when you walk.
How To Tie Shoes The Right Way (2 Ways – Depending On The Starting Knot)
The correct technique results in a balanced knot that sits horizontally and stays secure.

If your starting knot is left over right you’ll have to make a slight adjustment on the second knot.
If your starting knot is right over left, you’ll have to make a slightly different adjustment on the second knot.
To explain better please have a look at the infographics below.
To See A FULL Infographic On Each Of These Steps Click HERE
The Right Way – With The Beginning Knot Going Left Over Right
How To Tie Shoes – Step 1
For reference, Look at your shoe from your point of view perspective. The shoelace on the left is the blue end and the one on the right is the brown end.

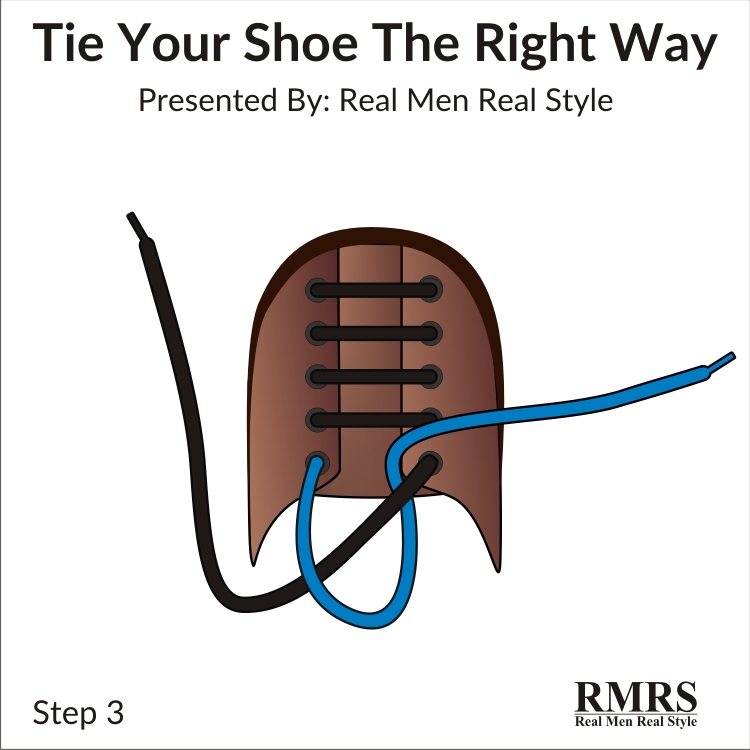
How To Tie Shoes – Step 2 & Step 3
Start with a left over right simple knot.

How To Tie Shoes – Step 4
Start with the loop on the right side

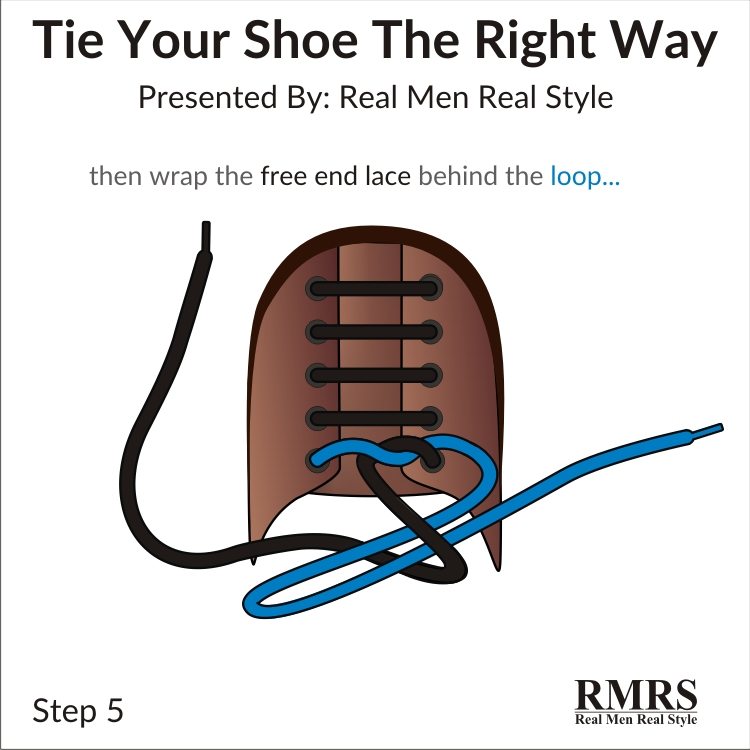
How To Tie Shoes – Step 5
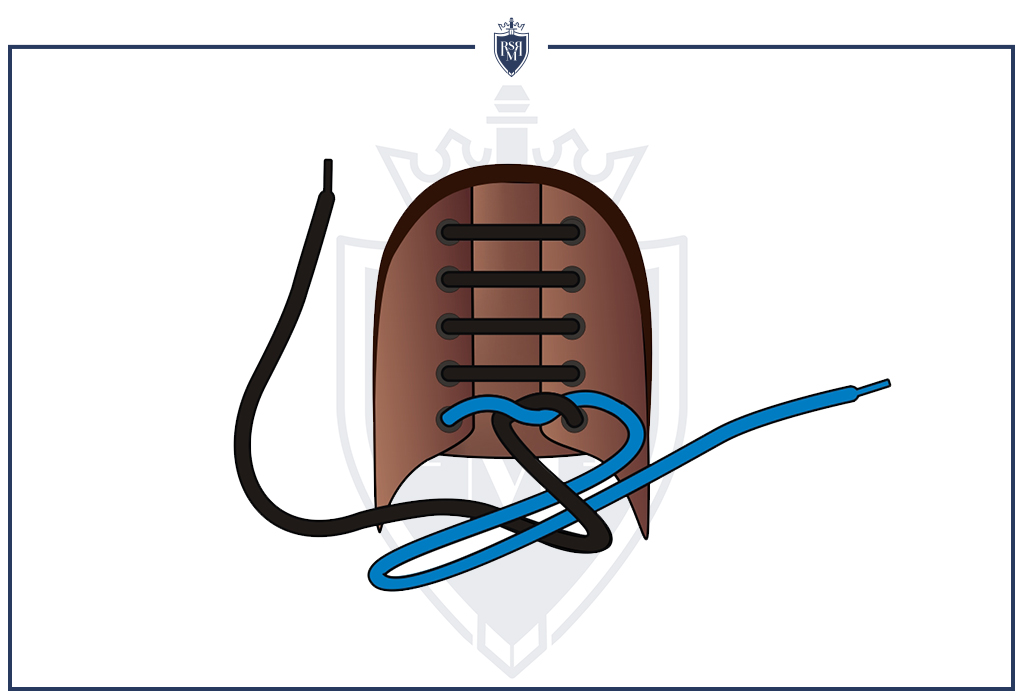
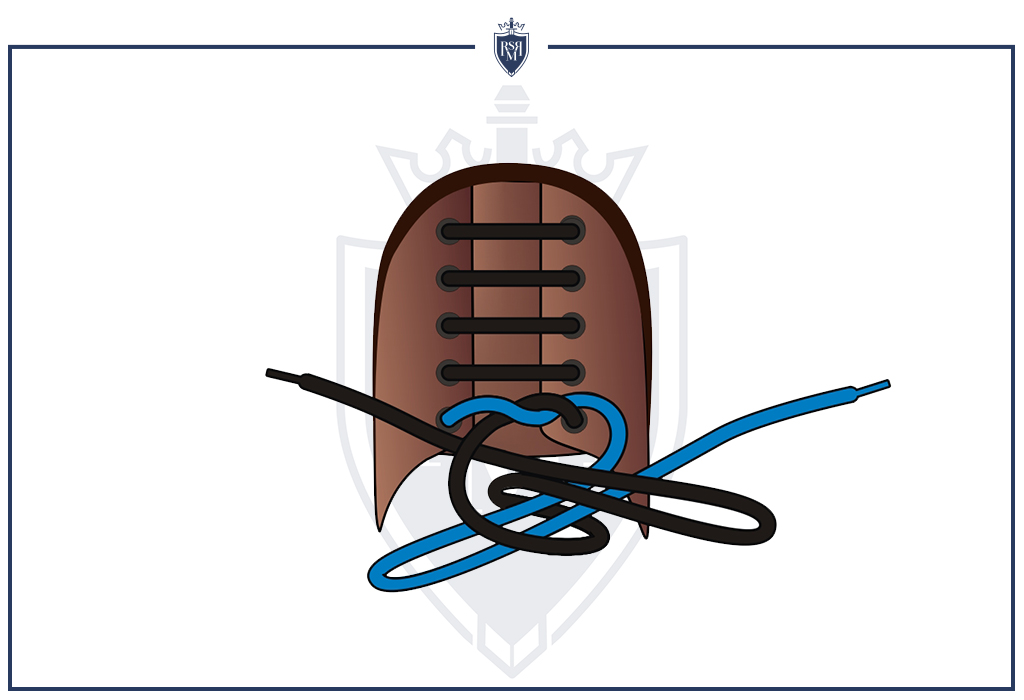
This step is the key.
Take the free-end lace and bring it around the blue lace, going behind the right loop.
Going behind the loop is the KEY. By bringing the lace around the loop towards you, rather than away from you allows the knot to lay horizontally.
How To Tie Shoes – Step 6
With the left lace now through the gap, hold both loops and pull them in opposite directions.
How To Tie Shoes – Step 7
Continue pulling on the loops until the knot is firmly secured.
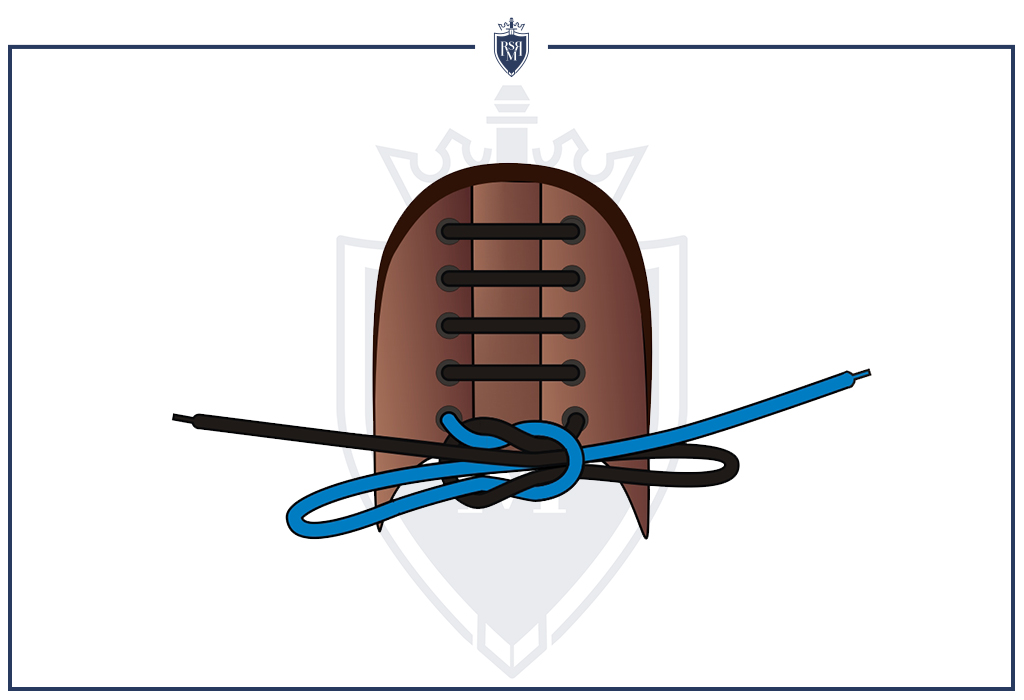
How To Tie Shoes – Step 8
Ensure the knot sits in the center and the shoelace lengths are even. That’s it!

Now here’s the right way if you start the loop right over left.
To See A FULL Infographic On Each Of These Steps Click HERE
The Right Way – With The Beginning Knot Going Right Over Left (Hint: It’s just the opposite)
How To Tie Shoes – Step 1

How To Tie Shoes – Step 2 & Step 3
Start with a left over right simple knot.


How To Tie Shoes – Step 4
Start with the loop on the right side

How To Tie Shoes – Step 5
This step is the key. It’s the opposite of the previous version.
Take the free end lace and bring it around the blue lace, going in front of the right loop.
Going in front of the loop is the KEY on this one. By bringing the lace in front of the loop away from you, rather than towards you allows the knot to lay horizontally.

How To Tie Shoes – Step 6
With the left lace now through the gap, hold both loops and pull them in opposite directions.

How To Tie Shoes – Step 7
Continue pulling on the loops until the knot is firmly secured.

How To Tie Shoes – Step 8
Ensure the knot sits in the centre and the shoelace lengths are even. That’s it!

To See A FULL Infographic On Each Of These Steps Click HERE
Frequently Asked Questions
How do you lace mens shoes?
For reference, Look at your shoe from your point of view perspective.
The shoelace on the left is the blue end and the one on the right is the brown end.
Start with a left over right simple knot.
Now start with the loop on the right side.
Take the free-end lace and bring it around the blue lace, going behind the right loop.
Going behind the loop is the KEY.
By bringing the lace around the loop towards you, rather than away from you allows the knot to lay horizontally.
With the left lace now through the gap, hold both loops and pull them in opposite directions.
Continue pulling on the loops until the knot is firmly secured.
Ensure the knot sits in the center and the shoelace lengths are even. That’s it!
What is the correct way to tie your shoes?
For reference, Look at your shoe from your point of view perspective.
The shoelace on the left is the blue end and the one on the right is the brown end.
Start with a left over right simple knot.
Now start with the loop on the right side.
Take the free-end lace and bring it around the blue lace, going behind the right loop.
Going behind the loop is the KEY.
By bringing the lace around the loop towards you, rather than away from you allows the knot to lay horizontally.
With the left lace now through the gap, hold both loops and pull them in opposite directions.
Continue pulling on the loops until the knot is firmly secured.
Ensure the knot sits in the center and the shoelace lengths are even. That’s it!
What is the granny knot used for?
The granny knot is the standard and most well-known technique for tying shoe laces. If you are tying your shoelaces with a granny knot, the laces tend to sit vertically (from heel to toe), instead of horizontally across the top part of your shoe like a bow-tie. There is also a higher likelihood that your laces will come undone. It also looks a little off when wearing a clean dress shoe. This produces an unstable and aesthetically incorrect bow-like knot which is referred to as ‘granny knot.’
Click below to watch the video – How To Tie Your Shoes Correctly. Hungry for more shoes knowledge? Check out my guide on how to keep your shoes clean and fresh.
[ad_2]
Source link

Hi! I’m a dedicated health blogger sharing valuable insights, natural remedies, and the latest scientific breakthroughs to help readers lead healthier lives. With a holistic approach to wellness, I empower individuals with accessible and actionable content, debunking myths and offering practical tips for incorporating healthy habits.